ALS - Astro Live Stacker
Website : https://als-app.org


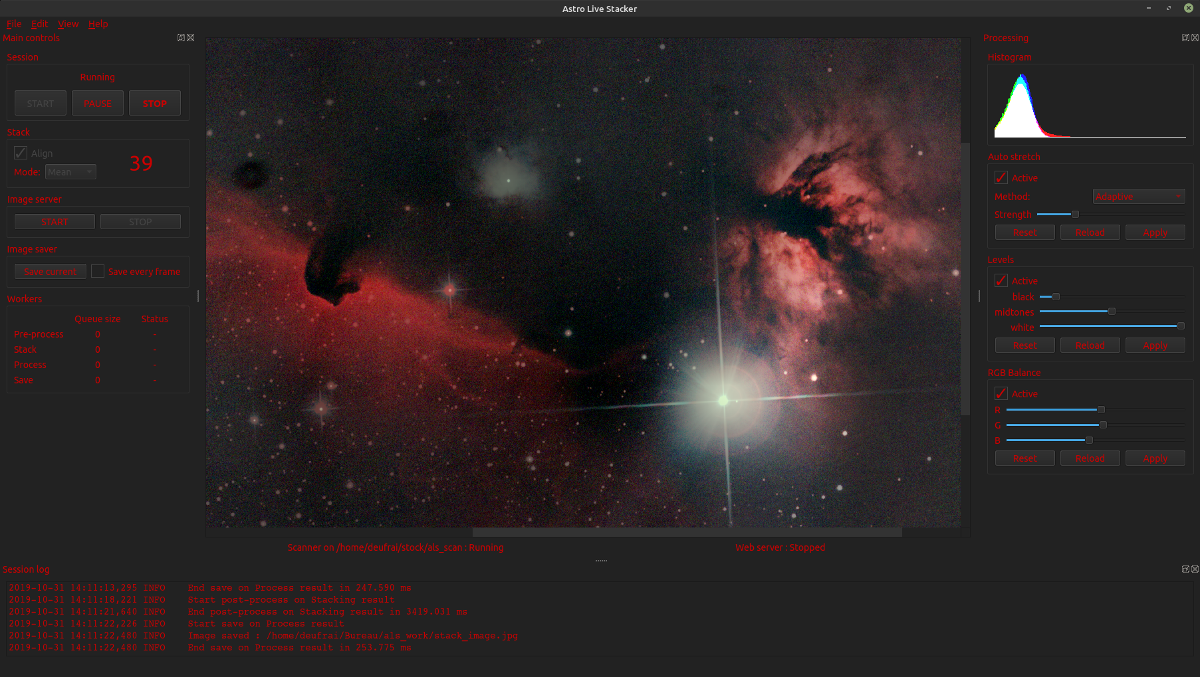
A desktop application for astrophotography live stacking.
Features
ALS polls a folder on your machine and aligns + stacks any new picture saved into that folder.
ALS is compatible with .fit and .fits files and RAW camera files : https://www.libraw.org/supported-cameras
After debayering (if needed), pictures are aligned and stacked. User can then enhance the resulting image with various processes :
auto stretch
levels
RGB balance
The resulting image can be saved to disk and served by a built-in web server, so your mates at the astro club can see your wonderful images.
Requirements
Running ALS from sources requires python version 3.6 or 3.7
Download and run pre-built binaries
Nightly builds are published here : https://als-app.org/nightlies
Download and run from sources
The following download and install procedure has been tested on a freshly installed Ubuntu 18 LTS (a.k.a. Bionic). Your mileage may vary.
Until ALS is properly released to the usual software outlets, you have two options to get ALS on your computer : Download an archive from GitHub or Clone the whole source code repo.
One word about what ALS versions you have access to, using either option : Stable ALS releases are available via downloadable archives published on ALS’s GitHub page. If you want to check what will be part of the next stable release, then cloning the repo is the way to go.
Download an archive from GitHub
Point your browser of choice to the ALS GitHub releases page
CLick the version you want to use
Download desired archive format, zip or tar.gz
Extract the archive in the folder of your choice
Clone the whole source code repo
Check if git is available on your system : Ask for git version in a terminal :
$ git --version
git version 2.17.1
if you get an error like :
$ git --version
git: command not found
Then you need to install git on your system. Simply issue the following command :
$ sudo apt-get update && sudo apt-get install -y git
2. clone ALS repo : you’ll have to specify the branch you want to check out :
master for latest stable release,
develop for bleeding edge features. Your
desired branch name must be used after the -b
option in the command
below :
$ git clone https://github.com/gehelem/als.git -b <branch_name_chosen_above>
Installation
In order to manage ALS’s various dependencies without modifying your current system’s Python install and libraries, you are advised to use Python Virtual Environments. The below procedure will guide you through the process of creating a virtual environment and installing ALS’s dependencies into it.
Note
All below commands have to be used in your terminal of choice. In all of them,
please replace ALS_HOME
with the
actual path of the folder in which you extracted the GitHub archive or cloned de
ALS repo. See
Download and
run from sources section for
details
Install a few system packages :
gcc and python3-dev to compile some dependencies (don’t be scared)
python3-venv to handle virtualenvs
$ sudo apt update && sudo apt install -y gcc python3-dev python3-venv
Dive into ALS folder.
$ cd ALS_HOME
Create your virtualenv with provided script
This will create a folder named venv inside the ALS_HOME folder, then download and install all dependencies into it.
$ ./utils/venv_setup.sh
Activate the newly created virtualenv
$ source ./venv/bin/activate
Setup ALS into your virtualenv in development mode. This is for now the only supported setup mode. This allows you to run ALS easily, as it adds a launcher script inside your active virtual env.
$ python setup.py develop
Launching ALS
Make sure your virtualenv is active
If your virtualenv is active, your command prompt is prepended with (venv). See example below :
(venv) user@host:~/als$
If you don’t see the (venv) part before your command prompt, this means your virtualenv is not active. Activate it using steps 4 & 5 of the Installation procedure.
just launch ALS from anywhere :)
$ als
Using ALS
Launch ALS
Click the ‘START’ button
If the configured scan folder does not exist, follow ALS advice and review your preferences
Setup you image acquisition system to save new pictures into the folder scanned by ALS
Start picture acquisition
Watch the magic do its work
Some hints on mouse navigation in the displayed image :
Mouse wheel : zoom in and out
Left click + mouse move : move around the image
Double click : fit image to view
Developing ALS
On top of the steps described in Installation and Launching ALS, you don’t need much to start developing on ALS.
All you have to remember when you work on GUI: ALS uses the Qt framework. If you modify/create .ui files, you’ll have to recompile the corresponding Python modules. This is done by calling the following script : utils/compile_ui_and_rc.py. All .ui files MUST be located inside the als.ui package. Compiled modules are located in the als.generated package.
For any other non GUI code, just edit the code and relaunch als each time you want to check your changes.
If you want to perform basic checks on the code before committing and pushing your changes, execute the following command from within the als folder. If the script’s exit code is 0 (zero), your code is safe to be pushed. It may not yet do exactly what it is meant for, but at least it won’t cause runtime errors due to syntax errors.
$ ./ci/full_build.sh
Happy hacking !!!